
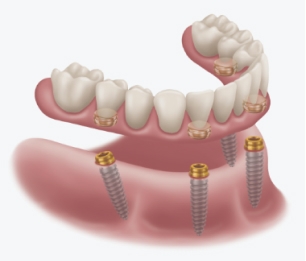
Locator Fixed™
Case Report
Case Report
 Dr. David A. Little, DDS
Patient Background
78-year-old female patient wanted to upgrade her implant retained soft tissue supported restoration to a fixed restoration. Using her existing LOCATOR abutments and the novel Zest LOCATOR FIXED solution, a fixed prosthesis was fabricated.
First Appointment
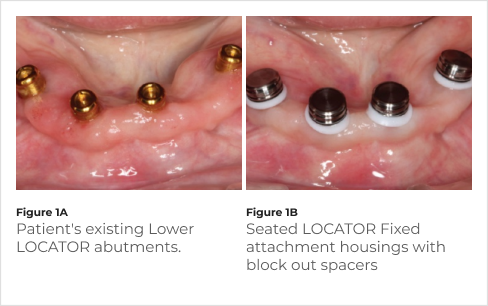
- Patient’s lower arch has four existing implants with LOCATOR abutments.
- LOCATOR scan bodies were placed, and a digital impression was accomplished using the Carestream 3800 intraoral scanner.
- Next the patient’s existing prosthesis was scanned including the intaglio surface.
- Then the patient’s opposing denture, the lower prosthesis and a bite was scanned.
- Then scans were uploaded to the laboratory.
- The laboratory technician designed a PMMA for try in for the fixed solution
- The prosthesis was then tried with the black processing inserts to verify occlusion.
- The black processing inserts were removed and replaced with the green LOCATOR Fixed inserts. The inserts were seated with the LOCATOR enhanced core tool by pressing firmly until the insert snaps into place.
- Place the prosthesis with the appropriate FIXED Insert over the LOCATOR abutments.
- Press firmly around the arch to seat the prosthesis. An audible click may be heard and confirms the seat.
- Hold the LOCATOR FIXED Seating Tool perpendicular to the occlusal plane applying pressure to the prosthesis
Try In Appointment
- Tried in PMMA to verify occlusion, tissue contour, and design.
- Laboratory fabricated a short term provisional using printed denture material and milled Crystal Ultra teeth.
Delivery Appointment
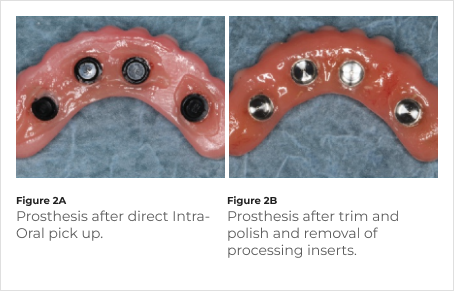
- At delivery appointment LOCATOR FIXED Housings with processing inserts were placed. Block out spacers were used to ensure no undercuts. The prosthesis was tried in to ensure proper space relieved for pick up. In this case a polyvinyl impression material was used to identify any areas that needed to be relieved.
- An intraoral direct pick up was accomplished using CHAIRSIDE Attachment Processing Material. Procedure best accomplished by having the patient close into light occlusion and hold while the CHAIRSIDE material sets.
- After removing from the mouth, the prosthesis was adjusted and polished using the Chairside Denture Prep & Polish Kit.

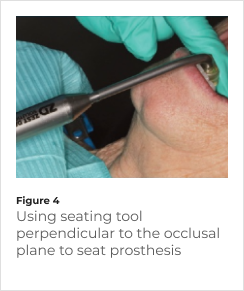
Seating the Prosthesis
Start with the most posterior Abutment on one side. Hold the tool perpendicular to the occlusal plane, pull firmly on the tool to apply pressure against the prosthesis, hold the other side of the prosthesis in place then activate the tool THREE TIMES over the Abutment.
Move to the other most posterior Abutment. Hold the tool perpendicular to the occlusal plane, pull firmly on the tool to apply pressure against the prosthesis, hold the other side of the prosthesis in place then activate the tool THREE TIMES over the Abutment.
Continue anteriorly around the arch. Activate the tool THREE TIMES over each Abutment location until all Abutments have been seated. A radiograph can be made to confirm inserts are fully seated.
Outcome
Patient was thrilled with immediate result and transition to a fixed solution. Scheduled for follow up hygiene visit. Another advantage of LOCATOR FIXED is that the prosthesis can easily be removed and reseated for hygiene visits. A long term prosthesis with reinforcement will be fabricated.

800.262.2310
800.262.2310
800.262.2310